| Friendly Expert Computer Help - In Plain English | |||

|
|
|
|
|
|
|
|
|
| PC911 > How-To > Miscellaneous > Once More Into The Fire |
Now that we know how to write audio CDs, let's move on to writing data CDs. In this section, I will first go over writing basic data CDs, then move on to writing hybrid CDs that work in both Macs and PCs, and finally conclude with writing enhanced CDs and bootable CDs. The program we will be using is Nero Burning ROM. Since basic concepts and file formats have already been covered in the beginner's guide as well as earlier in this tutorial, I will thus dive straight into explaining the program. If you feel the need to review any of the concepts, do so by all means. Let's get acquainted with our program.
Once you start Nero Burning Rom, the first thing you will see is a wizard that attempts to guide you through the process. For now, let's cancel that. Instead, go into the File menu and choose New. At this point you should see a dialog box like this:

|
Take a look at the section labeled A. This is where you choose which type of CD you want to burn. ISO means a normal data CD. Mixed Mode CD is what I call enhanced CD, which contains both audio and data. CD-Copy is a way to make an exact duplicate of a CD, data or audio. If you scroll down the list, you'll see options like Bootable CD, Hybrid CD (readable on both Mac and PC), UDF formats and UDF/ISO hybrids. The UDF format may be unfamiliar to you, and with good reason. It is not a format supported by CDR drives. Instead, it is the format preferred by CDRW and DVD drives. The format was designed to handle large file sizes and to minimize the necessary changes if a file needed to be added or deleted. Since this guide primarily focuses on writing CDR discs, I will not discuss the UDF format any further. A definition is included simply for completeness.
Let's write a normal data CD. So select CD-ROM (ISO) from the left hand side.
Now take a look at the part on the screen cap labeled B. These tabs represent the different groups options available to you, based on your selection of the type of CD you are writing. Click on the File Options tab (3rd one). Now you should see several groups of options. Refer to the screen cap for confirmation.
The section of the screen cap labeled C1 is where you can choose the format used to write the CD. Your best bet is to use ISO Level 1 for maximum compatibility. As mentioned above, while ISO Level 2 allows for long filename support, it is not supported under DOS and Win 3.1. If you must have long filenames, then check the Joliet checkbox in the part of the screencap labeled C4. This will create a secondary parallel directory listing with long filenames. Win 9x and NT will read that directory listing while older systems will read the 8.3 filenames from the ISO directory listing.
Now look at the section labeled C2. From here you can set what mode the tracks are written in. Mode 1 is what normal CD-ROMs are written in. It has the widest compatibility. Mode 2/XA is a special mode for writing multimedia CDs, such as a Video CD. In most circumstances, leave the Mode on Mode 1 as Mode 2 CDs cause problems with older CD-ROM drives.
In section C3, you can change the character set used to describe the filenames. This determines what "symbols" can be used in a filename. This is analogous to saying that a filename can use the whole range of letters found in French, or perhaps Greek. Obviously the two character sets are different (French vs. Greek). In our case, the three available options are: ISO 9660, DOS and ASCII. The differences between the three formats are subtle. Most often, you will not run into a situation where the differences matter. Thus, for maximum compatibility, leave the character set on ISO9660.
Moving on to section C5, this is where you can relax the ISO9660 standards, such as allow for more a directory depth of more than 8 levels. But be warned, some systems may not read the CD-ROM correctly if the standard is relaxed. This naturally leads us to section D. Pay attention to this bottom area. If you have selected an option that could make the CD-ROM unreadable on some systems, a warning message, like the one shown, will appear.
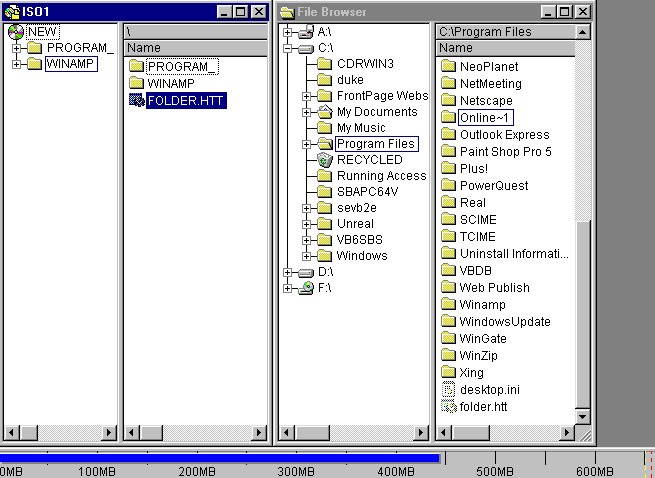
With all the options set, you are ready to select your files. Once you click on New, you should see two windows open up.
|
On the left hand side is whatever is currently in your CD. On the right is a view of the files on your system. Simply drag and drop whatever files you need into the left side. Notice the blue bar at the bottom of the screen, which indicates how much space is still available.
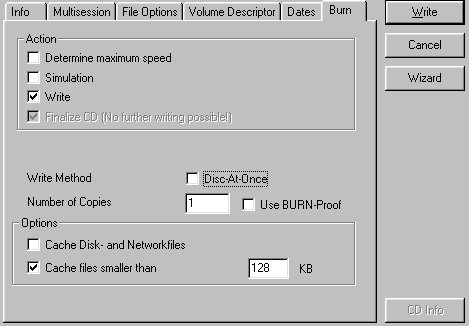
Once you are done selecting your files, click on the Write CD from the File Menu. This will bring you the following screen.
|
From this screen, you can change some of the settings for writing the disc. Most of the options are self explanatory. Don't use disc-at-once unless you won't be adding any more sessions to the disc. The option is most useful for Audio CDs, as it eliminates the 2 second gap problem. One nice feature that Nero has is caching. Under the options box, you can choose to cache small files. By default, it is enabled. You should leave it as is because caching will significantly decrease your chances of getting a coaster, especially for writing small files and files on slow mediums like CD-ROMs and floppies. God forbid that anyone would actually try to burn a file from a floppy! Once you are done, click on Write CD. One thing I should mention is that don't finalize the CD until all of your sessions are written. Once a CD is finalized, no additional files can be stored. But once you are sure you won't be adding any more sessions, do finalize the CD. Some older CD-ROM drives have a hard time reading non-finalized discs.
| Back To Top Of Page | ||
|
[PC911 Home]
[News]
[How-To's]
[Tips & Tweaks]
[Reviews]
[Freeware]
[Best Prices]
[Links] [Search] [About PC911] [Link To PC911] [Support PC911] [Legalese] ©Copyright 1998-2022 PC911 Webmaster |
||